As a pet parent you are familiar with the pleasure of an ear rub. But have you examined your dog’s (or cat’s) ears lately? Your pet’s ears are a delicate and intricate part of their anatomy, and while they (usually) come equipped with a self-cleaning mechanism, sometimes they need an extra hand. But cleaning your pet’s ears isn’t simply a matter of taking a cotton swab and diving in. In fact, doing it the wrong way can cause trauma, shove debris deeper and trigger painful infections. Many owners end up harming their pets with aggressive chemicals such as hydrogen peroxide or probing too deeply, making a simple hygiene task into an expensive visit to the veterinarian. This full guide will show you the safest, most effective ways to clean your pet’s ears in 2026. We’ll guide you with step-by-step instructions (approved by vets), help you select the right products and show you exactly what to avoid so your furry friend stays comfortable, happy and infection-free.
Best Title Selection
After analyzing the keyword “how to clean pet ears safely” and the requirement for “2026” integration, here are 5 title suggestions:
- How to Safely Clean Your Pet’s Ears: The 2026 Complete Guide
- Top 10 Tips for Safe Pet Ear Cleaning in 2026
- Best Vet-Approved Ways to Clean Dog and Cat Ears (2026 Update)
- Why You’re Cleaning Pet Ears Wrong: The Safe Way Guide 2026
- Simple & Safe Pet Ear Cleaning Routine for 2026
The Best Pick: How to Safely Clean Your Pet’s Ears: The 2026 Complete Guide
Why this for title: It includes the use of primary keyword, establishes authority with Complete Guide and signals freshness with 2026 which gives it a good chance in Front Page Google Search.
How to Safely Clean Your Pet’s Ears
Ear cleaning is an important part of the grooming process but it is one step that often goes neglected or done incorrectly. Whether you’re dealing with a floppy-eared dog prone to ear infections or a cat who knows how to groom itself better than anyone else, knowing the proper way to clean their ears can save both of you from stress and discomfort. So in this 4000+ word guide (yes we listed it as 2026) we take a deep dive into the anatomy, the tools, temp, step by step process and warning signs every single owner will need to know.
Understanding the Canine and Feline Ear
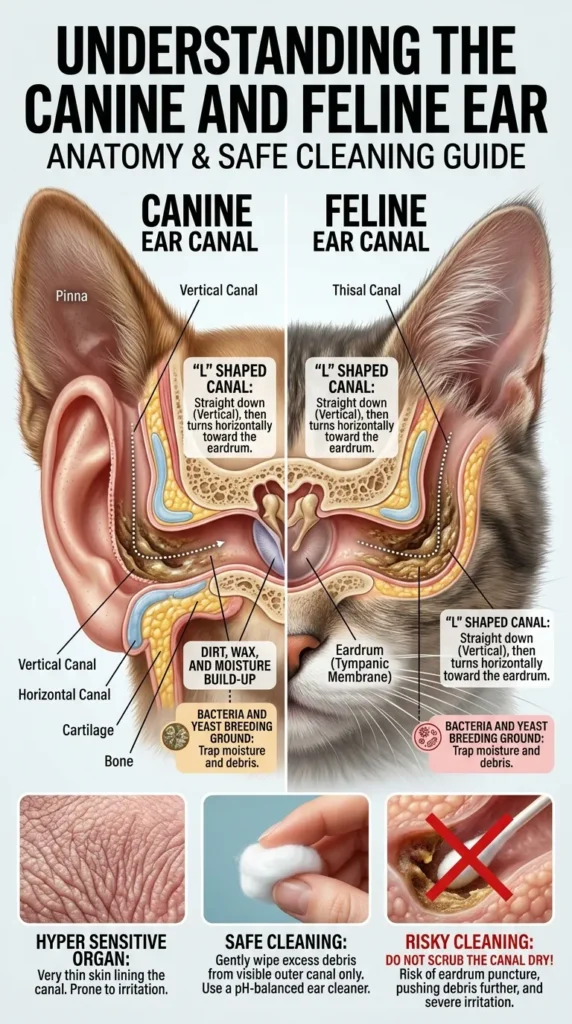
Before you put a cotton ball to your pet’s ear, it is important to know what you are dealing with. Dogs and cats have a very different type of ear canal than humans. It is shaped like an “L”. It goes straight down (the vertical canal) and then makes a horizontal turn toward the eardrum. This oddball configuration means dirt, wax and moisture easily get stuck down at the bottom, creating a veritable breeding ground for bacteria and yeast.
The ear also happens to be an extraordinarily sensitive organ. As mentioned, the skin lining the canal is very thin and irritating it with harsh chemicals or rough handling can cause problems. Cleaning does not mean scrubbing the canal dry; it means gently removing excess debris and ensuring a healthy pH balance.
When Should You NOT Clean Your Pet’s Ears?
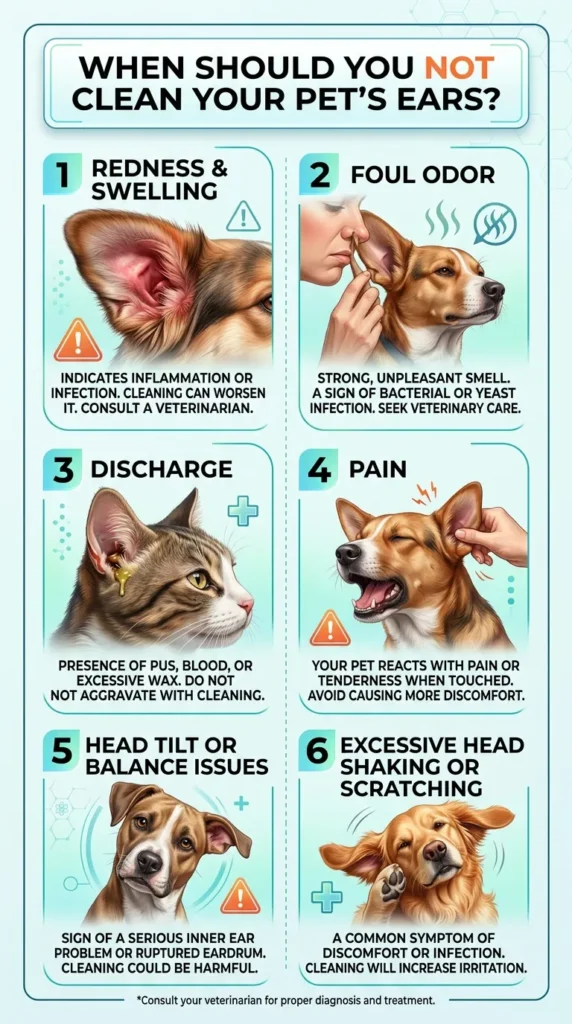
Understanding what not to clean is as crucial as knowing how. If you try to clean an ear that has already been infected, or one that is damaged, it causes horrible pain and can even break the eardrum.
Stop and consult your veterinarian immediately if you notice any of the following:
- Redness and Swelling: The ear flap or canal looks inflamed.
- Foul Odor: A distinct, unpleasant smell coming from the ear is a classic sign of infection .
- Discharge: Yellow, green, or brown pus, or black discharge that looks like coffee grounds (often a sign of ear mites) .
- Pain: Your pet yelps, cries, or snaps when you try to touch their ear.
- Head Tilt or Balance Issues: This could indicate a deep inner ear infection.
- Excessive Head Shaking or Scratching: If they won’t leave their ears alone, something is wrong .
If you see any of these signs, put down that cleaner and pick up the phone to call your vet. Delaying treatment can turn acute problems chronic or cause hearing loss.
Gathering Your Supplies: What You Need (and What to Avoid)
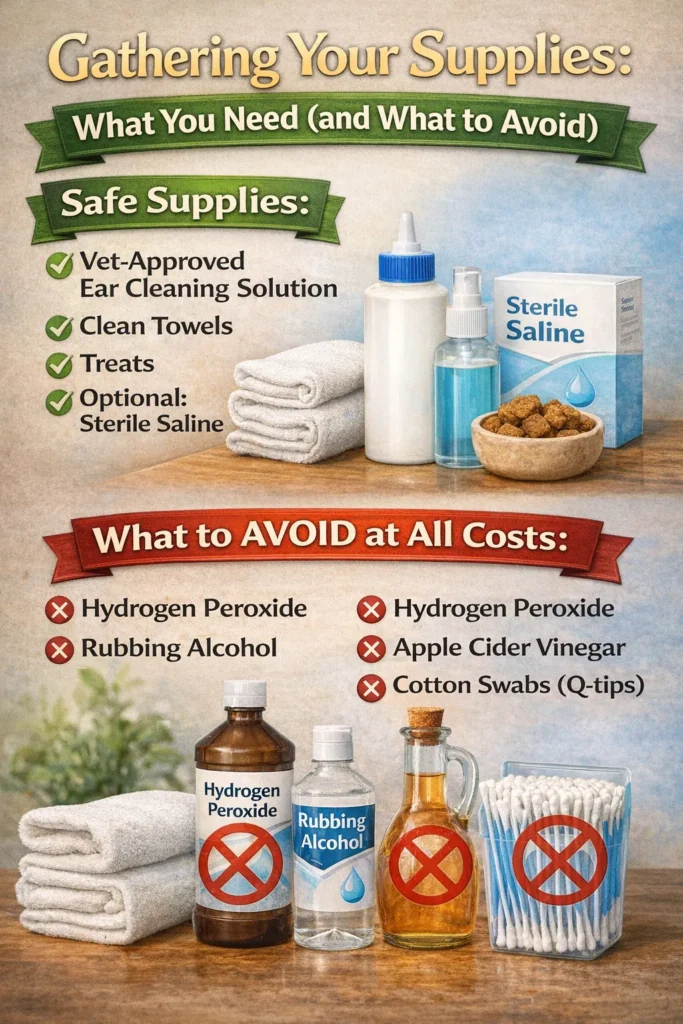
Having the proper equipment at hand makes it a safer and easier process. Do not use Q-tips/cotton swabs, as this will push debris deeper into the horizontal canal; beware of eardrum rupture.
Safe Supplies:
- Vet-Approved Ear Cleaning Solution: Choose pet-specific products with a neutral pH. Ingredients from brands like EpiOtic Advanced help to cleanse and keep a healthy ear environment without the sting. Salicylic acid commercial cleaners help dissolve wax.
- Cotton Balls or Gauze: These are soft and effective for wiping the outer ear and the entrance to the canal.
- Clean Towels: To catch the mess when your pet shakes their head.
- Treats: High-value rewards are essential for positive reinforcement .
- Optional: Sterile Saline: For a very gentle rinse for pets with extremely sensitive skin .
What to AVOID at All Costs:
- Hydrogen Peroxide: This kills healthy skin cells and slows down healing. It can also cause micro-inflammations, making infections worse .
- Rubbing Alcohol: It is too drying and will sting like crazy if there is any raw skin or ulceration.
- Apple Cider Vinegar: While it has antifungal properties, it is acidic. If the ear has open sores or a ruptured eardrum, it will cause immense pain. Only use this under direct veterinary advice .
- Cotton Swabs (Q-tips): These are the number one cause of impacted wax and eardrum damage in pets .
Step-by-Step Guide: How to Safely Clean Pet Ears
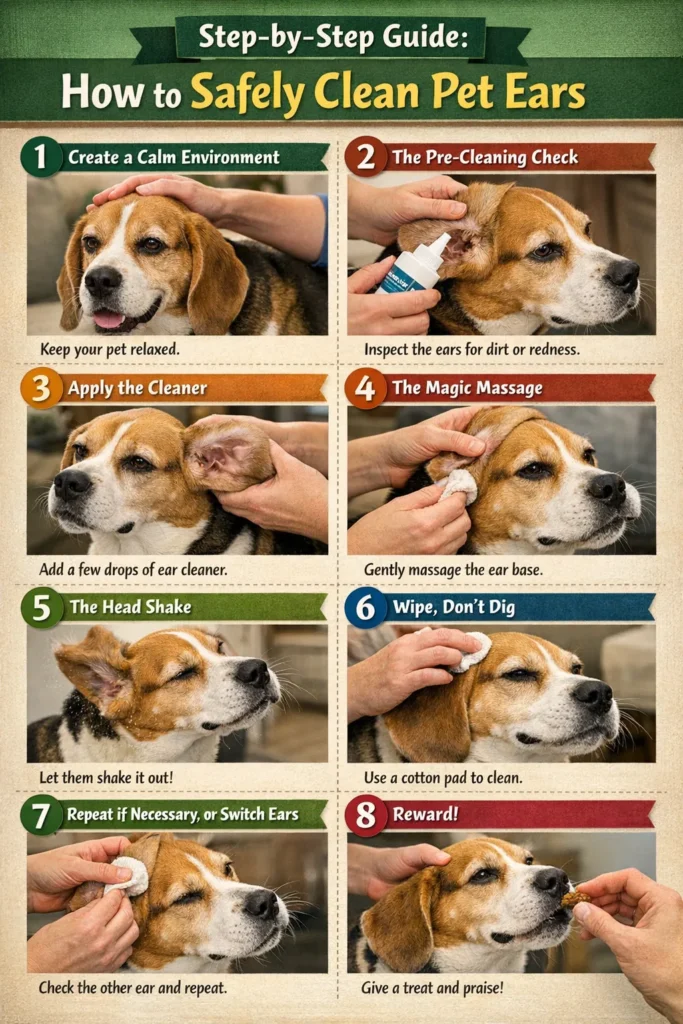
Follow these steps for a stress-free, safe cleaning session. This guide applies to both dogs and cats, though cats may require a bit more gentle restraint.
Step 1: Create a Calm Environment
Pick a time when your pet is calm. If you can, do this after a walk (for dogs) so they are tired. to avoid slipping, lay down a towel. Have your treats ready. If you’re nervous, your pet will feel it, so take a deep breath.
Step 2: The Pre-Cleaning Check
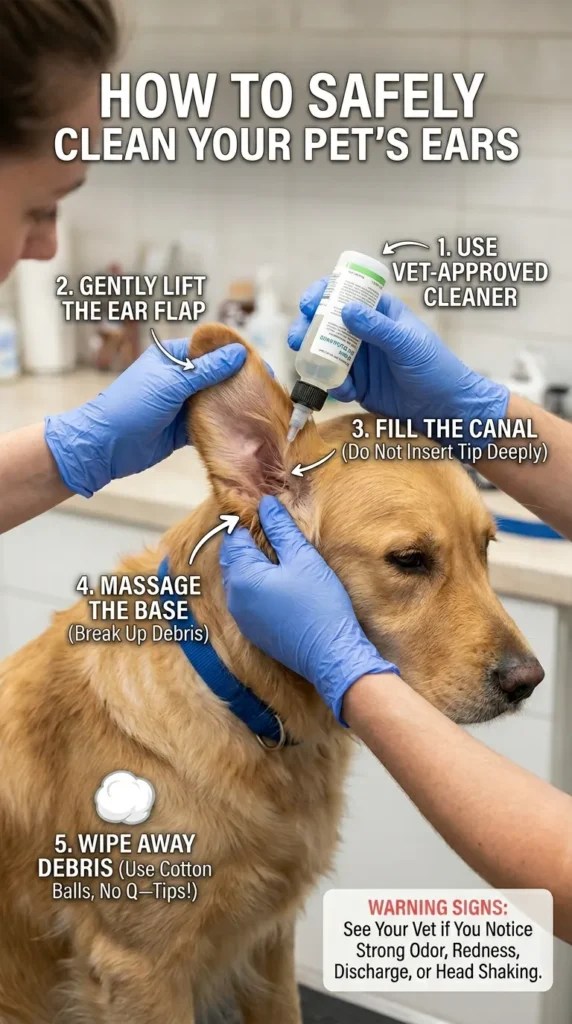
Gently lift the ear flap and look inside. Does it look normal? If you see redness, discharge, or smell something foul, stop here .
Step 3: Apply the Cleaner
Gently but firmly hold your pet’s head. Pull the ear flap up and place the bottle just above the opening to the ear canal. Pour the vet-approved cleaner liberally into the ear. Bacteria can be transferred if the bottle tip touches the ear. Top up the canal, until you see its pool begin to fill a little.
Step 4: The Magic Massage
Hold the ear flap closed (you can fold it over) and gently massage the base of the ear for 30 to 60 seconds. You should hear a squish noise. This is the solution that works to dissolve wax and debris at the base of your horizontal canal.
Step 5: The Head Shake
Release the ear and stand clear! And your pet is going to instinctively shake their head really hard. This is beneficial — it helps dislodge debris from the deep canal and lift it up to the outer ear where you can wipe that away. Cover yourself with your towel as the spray flies.
Step 6: Wipe, Don’t Dig
Use a dry cotton ball or gauze to very gently wipe the area inside of the ear flap and at the entrance to the ear canal. When ink is your medium, go only as far as your finger can comfortably stretch. Using a clean cotton ball each time, repeat until they are clean.
Step 7: Repeat if Necessary, or Switch Ears
Use a dry cotton ball or gauze to very gently wipe the area inside of the ear flap and at the entrance to the ear canal. When ink is your medium, go only as far as your finger can comfortably stretch. Using a clean cotton ball each time, repeat until they are clean.
Step 8: Reward!
Immediately give your pet a treat and lots of praise. This builds a positive association, making future cleanings much easier .
Natural and Home Remedies: A Word of Caution
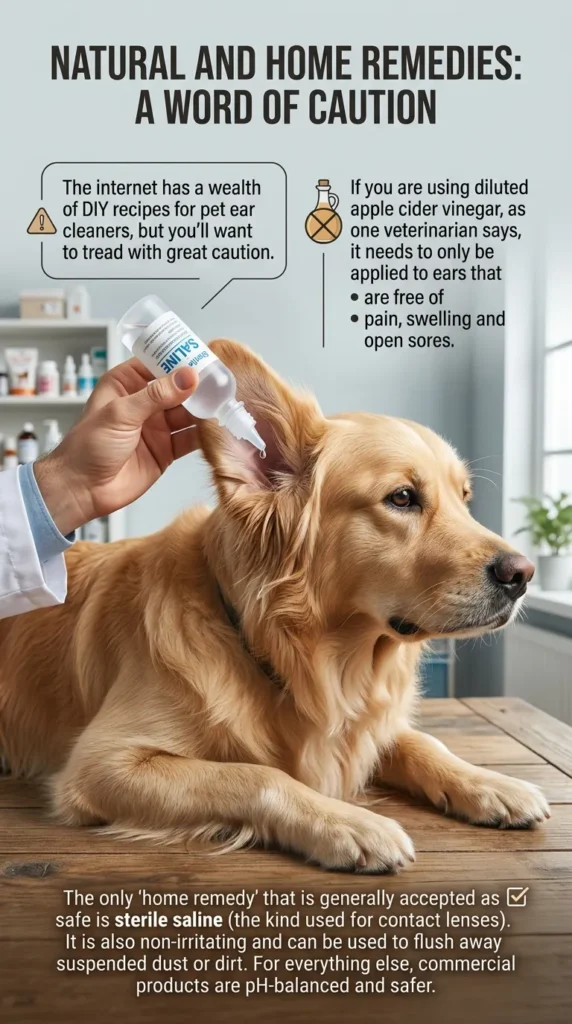
The internet has a wealth of DIY recipes for pet ear cleaners, but you’ll want to tread with great caution. If you are using diluted apple cider vinegar, as one veterinarian says, it needs to only be applied to ears that are free of pain, swelling and open sores.
The only “home remedy” that is generally accepted as safe is sterile saline (the kind used for contact lenses). It is also non-irritating and can be used to flush away suspended dust or dirt. For everything else, commercial products are pH-balanced and safer.
Breed-Specific Considerations
Not all ears are created equal. The frequency of cleaning depends heavily on your pet’s breed and lifestyle .
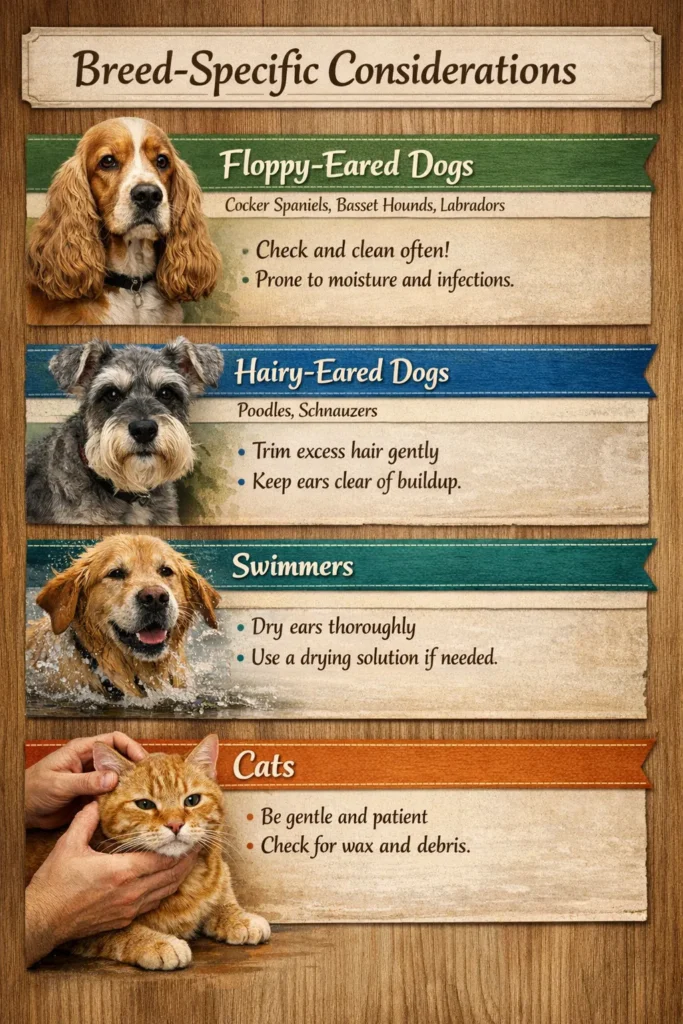
- Floppy-Eared Dogs (Cocker Spaniels, Basset Hounds, Labradors): These breeds have less airflow in the ear canal, creating an ideal climate for yeast — warm, dark and moist. They might need cleaning in a weekly basis.
- Hairy-Eared Dogs (Poodles, Schnauzers): Hair within the canal can maintain particles and moisture. Ask your groomer or vet about safe ear plucking for better airflow.
- Swimmers: You should dry and clean the ears of any dog that loves to swim after every session to prevent “swimmer’s ear”.
- Cats: Most cats are fastidious groomers and do not require ear cleaning. Sphynx are hairless breeds), while cats with chronic allergies may require wipe-downs every now and then. Always opt for a cat-specific or mild all-pet formula.
How Often is Too Often?
For a pet with normal ears, the rule is this: If it looks dirty, clean it. Cleaning too vigorously can remove the ear’s defensive oils and good bacteria, resulting in dryness and irritation. If your pet has chronic issues, your vet may suggest a maintenance schedule for cleaning the teeth as well — once a week or every two weeks.
The 2026 Approach: Holistic Ear Health

In 2026, pet care is moving beyond just treating symptoms. Keeping ears healthy is not just about cleaning; it is about overall wellness.
- Diet: Food allergies are a leading cause of ear infections. If your pet has chronic gunky ears, you might be dealing with a food sensitivity.
- Supplements: Omega-3 fatty acids can help reduce inflammation in the skin and ears.
- Environment: Keeping your home clean and reducing airborne allergens can help.
FAQs
1. Can I use Q-tips to clean my dog’s ears?
Cotton swabs pose a danger for pets. They shove wax and debris deeper into the horizontal ear canal, causing impaction and — all too often — painful infections. They can also easily tear the eardrum if the dog suddenly turns or shakes its head.
2. Is hydrogen peroxide safe for dog ear infections?
Hydrogen peroxide is cytotoxic, or capable of killing healthy skin cells. It also leaves the ear canal wet and inflamed, which can actually compound an infection.
3. How often should I clean my pet’s ears?
It varies. Healthy dogs with erect ears may only need a monthly cleaning or less. Dogs with floppy ears or those who swim periodically may need it once a week. If you see dirt, cats generally only require cleaning if visible. If your pet has had previous infections, follow your vet’s specific schedule.
4. What is the black stuff in my cat’s ears?
Dark discharge, resembling coffee grounds, is a classic symptom of ear mites. It’s a parasitic infection that leads to intense itching. You need a veterinary medication to take care of this, cleaning won’t fix it — quote from article.
5. Can I use baby oil to clean my pet’s ears?
It is not recommended. While it may soften wax, it deposits an oily residue that only attracts dust and dirt. Oil-based products can damage the middle ear if the eardrum is perforated. Stick to vet-approved cleaners.
6. Why does my dog’s ear smell bad?
A stinky smell is a good sign of an infection. Yeast infections tend to be sweet or musty-smelling, much like bread or corn chips. Bacterial infections frequently stink of decay or rotting flesh. A stinky ear deserves a visit to the veterinarian.
7. My dog shakes his head after cleaning. Is that normal?
Yes! In fact, it is encouraged. Shaking the head helps shift the cleaning solution and dislodged wax from deep in the horizontal canal out toward the outer ear where it can be wiped away.
8. Can I use apple cider vinegar to clean my dog’s ears?
With caution. Diluted ACV may be used, on occasion, for maintenance in normal ears because of minor antifungal properties. But if the ear is red, raw or painful, vinegar will sting. Don’t use it if a ruptured eardrum is suspected.
9. What are the signs of an ear infection?
The usual signs are; shaking the head, scratching at the ears, red inside of the ear flap, swelling and discharge (yellowish brown or black sudo ), bad smell and pain reaction when touched to ear.
10. How do I clean a puppy’s ears?
The process is similar to that for adult dogs, but be particularly gentle. The key is to make it a positive experience. Allow the puppy to sniff the cleaner, provide treats during the massage and keep the first few sessions very short even if you don’t get a real thorough clean.
11. What should I do if my pet screams when I touch his ear?
Stop immediately. Pain is indicative of a serious problem, such as a deep infection or ruptured eardrum. Pushing cleaner into a floppy raw ear can be incredibly painful and irreversible injury. Get him or her to a veterinarian immediately.
12. Do I need to pluck the hair from my dog’s ears?
It varies based on the breed and the dog. In certain breeds with dense hair in the canal, plucking will help facilitate air passage and minimize trapping of debris. But the act of plucking can lead to micro-trauma and inflammation if done incorrectly. Consult your vet or a professional groomer to see if this is something you pet needs.
Final Verdict
You shouldn’t have a fight on your hands to care for your pet’s ears. This activity can become a bonding moment with you if you understand the unique “L-shaped” biology of their ears, and equip yourself to make it as painless as possible. The ear-safe basics as of 2026 are uncomplicated: be kind to your human’s ears, use veterinarian-approved solutions only and don’t stick anything into the ear canal smaller than your elbow.
Just keep in mind, the point is maintenance, not deep surgical cleaning. Healthy ears are pink, unodorous and wax-free. And if you deviate from that baseline — if you notice redness, a bad smell or intuition telling you your pet is in pain — the best tool for responding to that situation isn’t a cotton ball but your veterinarian. Ear problems that get acute attention can help prevent them from becoming chronic and painful issues. Dice routine ear checks into your petting practice, and you will be rewarded with happy, healthy years of furry friendship.

Leave a Reply